Custom DNS

The Custom DNS page lets you manage the DNS records for a domain. This includes viewing and editing existing records, adding new ones, and more. 

Changes made here affect how your domain connects to websites, email services, and other external providers. 

Enabling Custom DNS for the First Time

  1. Log into the Domain Name Management System
  2. Click the domain to you want to enable Custom DNS on
  3. In the “DNS” section, click Use Our DNS

    Important Note: Turning on Custom DNS will immediately change  the name servers for your domain. All current DNS settings for web and email will be  overwritten.

    If you proceed, the current websites and email will go offline until you add new DNS records or import a DNS zone file.

    If you have multiple DNS records to add, you can put them all in a text file and then import it after turning on Custom DNS. 

    Make the first line of the text file $TTL 3600.
    Enter each record in the standard DNS format of $hostname IN $record_type $value
  4. Check the box next to I have read and agree to the Domain Name Registration Agreement
  5. Click Turn On

You can now view and manage your domain’s Custom DNS.

Accessing the Custom DNS Page

Note: You must first complete the steps under “Enabling DNS for the First Time” before you can access the Custom DNS page. 

  1. Log into the Domain Name Management System
  2. Click the domain to you want to manage Custom DNS on
  3. Click Edit DNS

This will take you to the Custom DNS page. 

Custom DNS Page Overview

The Custom DNS page is divided into navigation tabs, DNS settings, and a DNS records table. 

Navigation Tabs

Current Settings: View and edit existing DNS records and DNS settings. 

Add New Record: Add new DNS records.

Forwarding: Set up website and email forwarding for the domain. 

Site Builder: Manage your domain’s Site Builder.

DNS Settings

DNSSEC: Turns DNSSEC on or off for the domain. See What is DNSSEC?

Time to Live: Sets the default Time To Live (TTL) for DNS records.

TTL determines how long DNS information can be saved, or “cached,” by Internet Service Providers (ISPs) before they check for updates again. The value is measured in seconds and acts as a maximum time limit for caching. 
ISPs cache DNS lookups to speed up site access. Instead of querying the authoritative name servers every time a domain is requested, they reuse the cached information until the TTL expires. 

Higher TTL values are best when DNS records rarely change. 

Lower TTL values are useful when you expect DNS changes, such as during migrations or troubleshooting. 

Note that ISPs may refresh records sooner than the TTL. The TTL simply sets the maximum cache duration. 

Download DNS Zone: Downloads the current DNS zone file. 

Turn On Dynamic DNS: Turns on Dynamic DNS. See Dynamic DNS.

Manage Dynamic DNS: Manage Dynamic DNS on your domain. See Dynamic DNS. Note: This button only appears if Dynamic DNS is turned on. 

Turn Off Custom DNS: Turns off Custom DNS.

DNS Records Table

The DNS Records table shows all records currently configured for the domain. 

Type: The DNS record type (A, AAAA, CNAME, MX, TXT, etc.).

Host: The hostname the record applies to (@ represents the root domain).

Data: The value the record points to. This depends on the record type and may be an IP address, host name, mail server, or text value.

Change Record: Indicates whether a DNS record can be modified.

Some records cannot be changed because they are required for active services. When a record is locked, the interface prevents changes to protect required configurations. 

Edit: Allows you modify an existing domain record. Records required for current services may not be editable. 

Delete: Removes the DNS record from the domain. Records required for current services may not be deleted. 
Renewing Domains

Please follow these steps to renew a single domain on your account:

  1. Log into the  Domain Name Management System
  2. Click the Renew button or Add Time button next to the domain. The renew button appears if the domain expires within the next 90 days. Otherwise, Add Time appears. Both buttons do the same thing.
  3. Select the length of renewal and any add-on services to add
  4. If additional domains expire within the next 90 days, you can check boxes to renew those domains and select the length of renewal for them
  5. Click Proceed to Checkout
  6. Enter payment information and click Pay Now

If you are not able to log in, you can submit a one-time payment through our Contact us page.

Alternately, you can renew multiple domains on the same account:

  1. Log into the  Domain Name Management System
  2. Select Renew Domains from the drop-down navigation menu
  3. Check the boxes for each domain to renew
  4. Click Renew
  5. Select the length of renewal and any add-on services to add
  6. Click Proceed to Checkout
  7. Enter payment information and click Pay Now

You can renew a domain at any time before it expires.

Most domains can still be renewed during the 39 days that follow the expiration. On the 40th day, most domains enter the Redemption Grace Period. The Redemption Grace Period is a 30 day period where the domain can still be reactivated, but the cost to reactivate is much higher. Please see our Pricing Page for information about the costs of reactivation, and contact us for help reactivating a domain that is in the Redemption Grace Period.

Important Note: Not all domain types have the same renewal period. Not all domain types enter the Redemption Grace Period. The .uk registry provides 90 days to renew and does not offer the Redemption Grace Period. There is no Redemption Grace Period for .ws domains.

Email Forwarding with Pair Pro Mail

You can use Pair Pro Mail to automatically forward email to another address. Please follow these steps if you want to set up Forwarding in Pair Pro Mail:

  1. Log into the mailbox at pairpromail.com
  2. Click the gear icon
  3. Click All settings
  4. Scroll down and click Rules
  5. Click Auto forward
  6. Toggle the switch to On
  7. Enter the destination email address
  8. It is not required to check Keep a copy of the message, but
    we recommend checking it
  9. Click Apply Changes

.eco Eligibility

The .eco registry creates domains in an inactive status (serverHold). The domain is activated after the owner creates a profile at profiles.eco and then affirms eligibility . Information about eligibility can be found on the go.eco website.

The registry emails the Registrant (Owner) after the domain is registered. The email has instructions on creating a profile. Owners can go to profiles.eco/user/resend-email to resend the email.

Please contact us if you do not receive anything after submitting the resend-email request.

Transferring a .uk Domain to Us

The transfer process for .uk, .co.uk, .me.uk, and .org.uk domains is different from other types of domains. Instead of starting the transfer at the new registrar, .uk transfers are started at the current registrar.

Transferring a .uk domain does not renew it, so we do not charge for .uk transfers.

To transfer a .uk, .co.uk, .ltd.uk, .me.uk, or .org.uk domain to Pair Domains, ask the current registrar to initiate a transfer request to the Registrar Tag ID: PAIRNETWORKS. Once the request is made, we will contact you via email to claim the transferred domain.

If you are not sure who your current registrar is, you may check in WHOIS.

Before transferring, you must verify that a valid, working email address is stored in the contact information at your current registrar. We will use this address to contact you to complete the transfer.

What Happens When a Domain Expires?

When the end of the day on the expiration date is reached, a domain will be disabled. The website stops working and email sent to the domain bounces back to the sender.

It is still possible to renew a domain after it expires. Most domains enter a Renewal Period where the domain can be renewed normally. Registrars can choose the length of the Renewal Period for generic top-level domains like .com, .net, and .org. The maximum length they can choose is 45 days. We use a 39 day Renewal Period.

Country code top-level domains like .uk can have different Renewal Periods. The .uk registry provides 90 days.

If a domain is in the Renewal Period, you can log into your account to renew it.

Redemption Grace Period

After the Renewal Period, most domains enter the Redemption Grace Period. This is a 30 day period where the domain can still be reactivated, but the registries charge more for reactivation. Please see our Pricing Page for information about the costs of reactivation, and contact us for help reactivating a domain that is in the Redemption Grace Period.

There is no Redemption Grace Period for .uk or .ws domains. They go directly from the Renewal Period to the Pending Delete Period.

Please contact us to reactivate a domain from the Redemption Grace Period.

Pending Delete Period

After the Redemption Grace Period (or the Renewal Period for domains that don’t offer a Redemption Grace Period), a domain enter a 5 day Pending Delete Period. During this period, nothing can be done with the domain. After 5 days, the domain is deleted and can be registered as a new domain.

Setting Up Pair Pro Mail in Outlook

If you have not already created a mailbox, please visit our guide to Adding Pair Pro Mail to Your Domain.

After you create a mailbox, you can follow these steps to set it up in Outlook:

1. Open the Outlook app.

2. If this is your first time using the Outlook app, skip to Step 5.
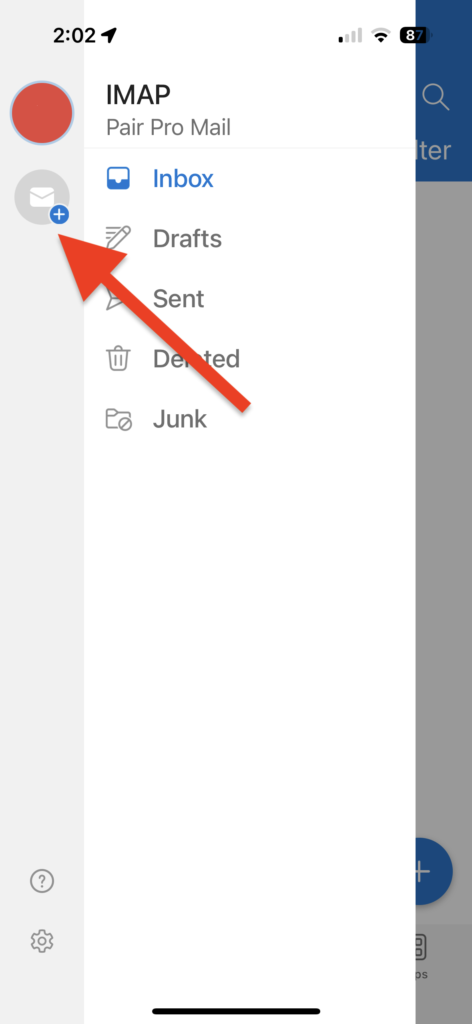
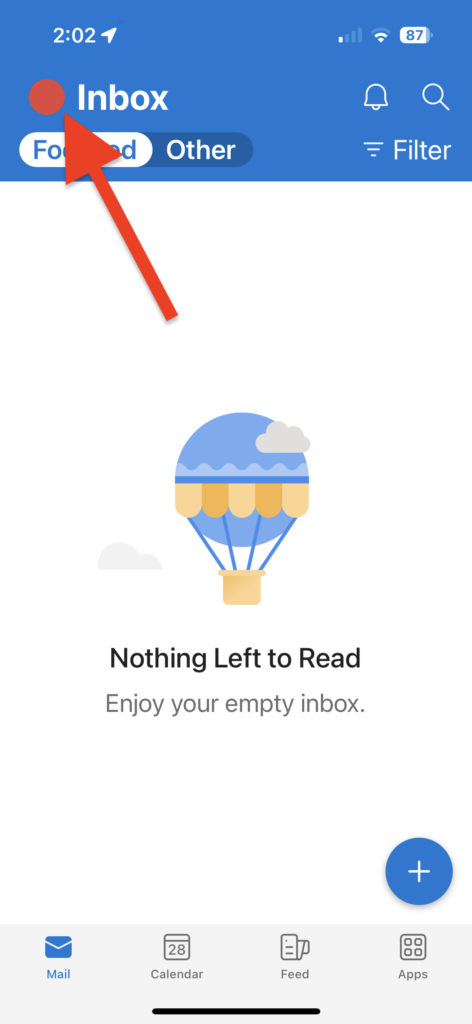
If you have used the Outlook app before, open the menu from the upper left.

Where to find the menu

3. Tap the envelope with the plus icon.

Where to add an account

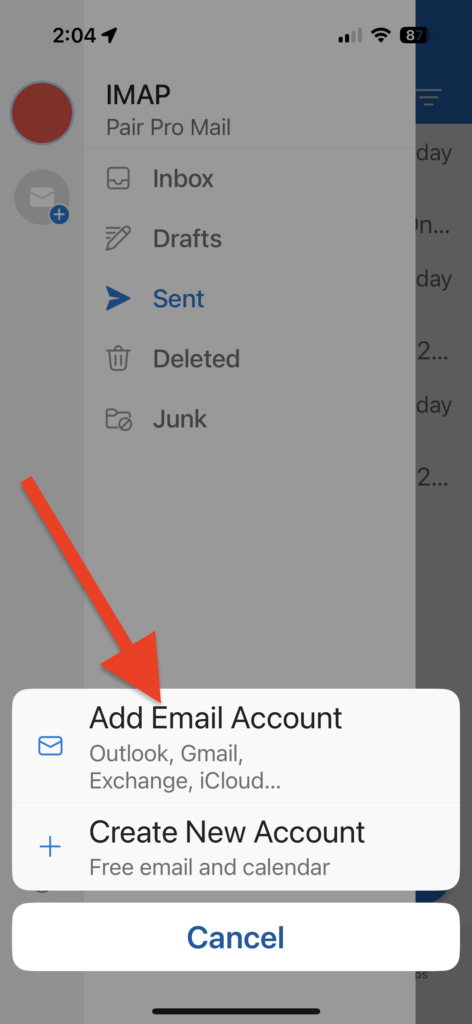
4. Select Add Email Account.

Where to add an email account

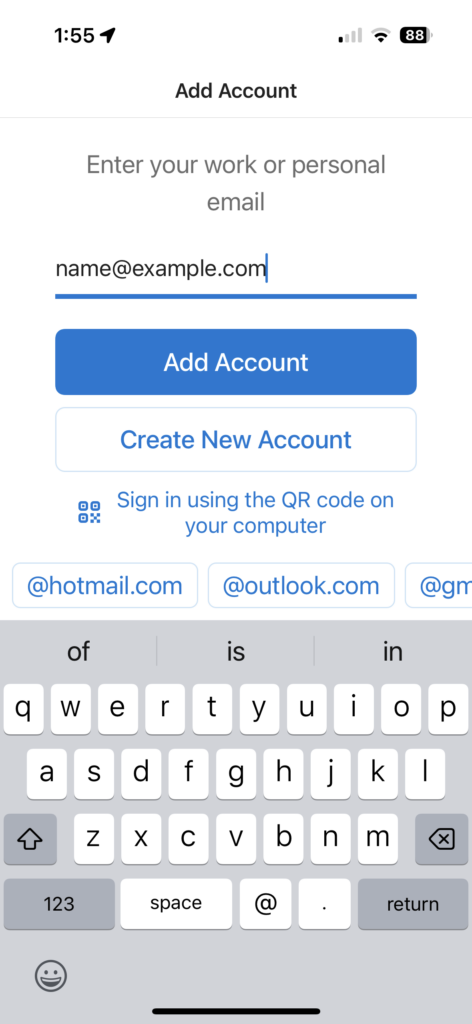
5. Enter your email address, and tap Add Account.

What the Add Account screen looks like

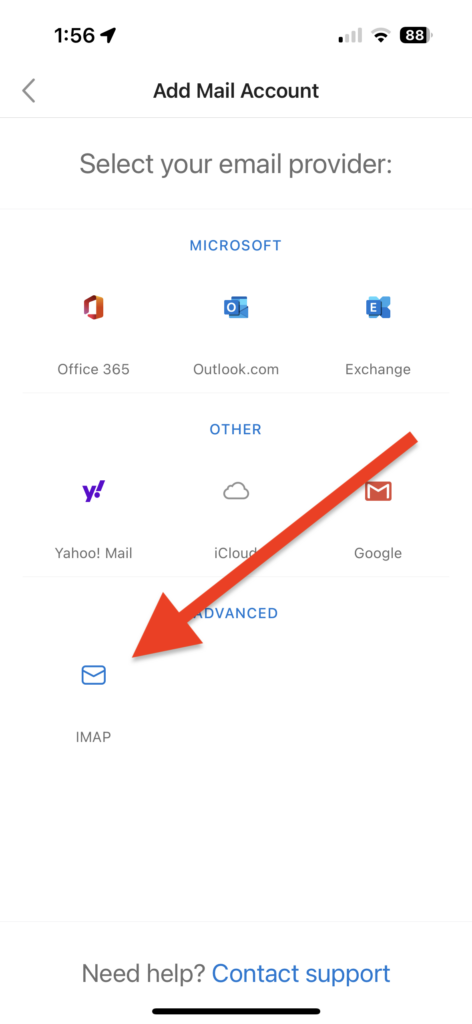
6. Tap IMAP.

Where to find IMAP

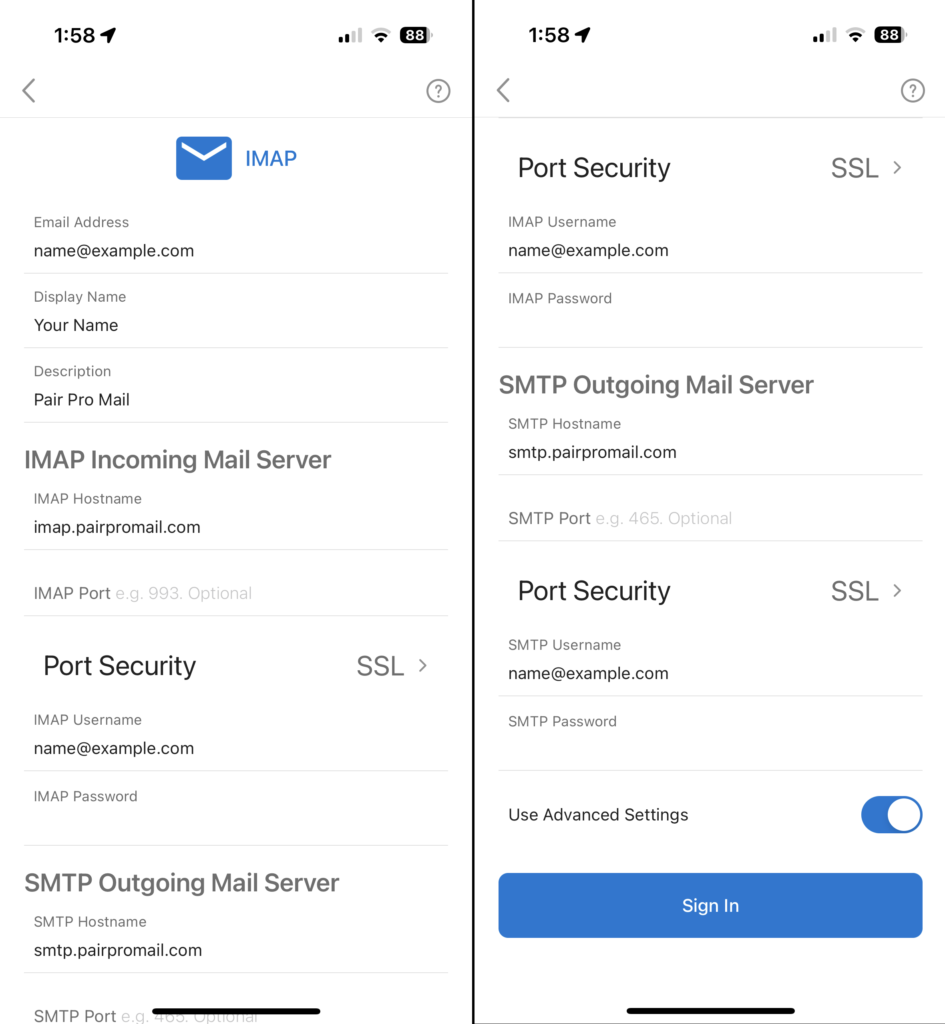
7. Enter the following information:

Email AddressThis is the email address for the mailbox
Display NameThis name will appear next to your address when you send email
DescriptionThis will help you identify your account in the Outlook interface
IMAP Hostnameimap.pairpromail.com
IMAP PortLeave this blank or enter 993
IMAP UsernameThis is the email address for the mailbox
IMAP PasswordThis is the password for the mailbox
SMTP Hostnamesmtp.pairpromail.com
SMTP PortLeave this blank or enter either 465 or 587
SMTP UsernameThis is the email address for the mailbox
SMTP PasswordThis is the password for the mailbox

What the IMAP settings look like

8. Tap Sign In.

Accessing Pair Pro Mail in Gmail

You can set up Autoforwarding to direct mail sent to your Pair Pro Mail account to your Gmail account.

  1. Log in at https://pairpromail.com/
  2. Click the gear icon in the upper right of the page
  3. Select All Settings
  4. Mail settings should be automatically selected. If it is not, select it
  5. Scroll down and select Rules
  6. Click Auto forward
  7. Toggle the switch to On
  8. Enter your Gmail address
  9. Click Apply Changes

Setting Up Pair Pro Mail in Mac Mail

After you create a mailbox, you can follow these steps to set it up in Mac Mail:

1. Open your Mac’s Mail app

2. In the top navigation bar, click Mail

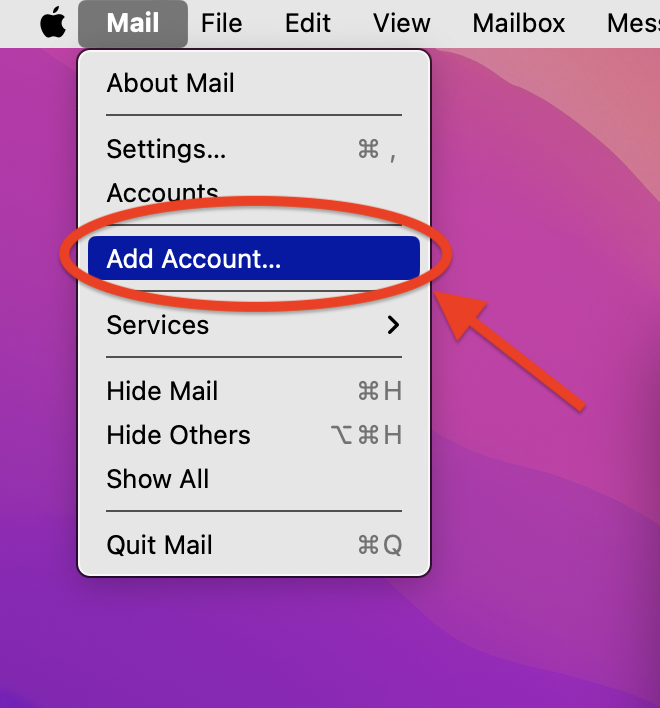
3. Select Add Account from the drop-down

Where to find the menu option to add an account

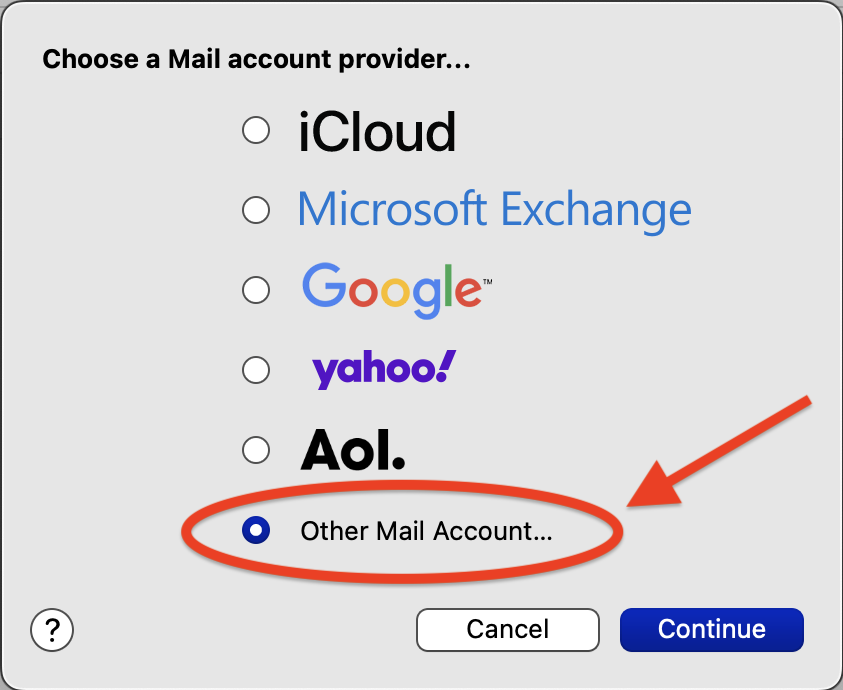
4. Select Other Mail Account, then click Continue

Where to find the Other Mail Account... option

5. Enter the following information:

NameThis name will appear next to your address when you send email
Email AddressThis is the email address for the mailbox
PasswordThis is the mailbox password

What the Add a Mail account window looks like

6. Click Sign In

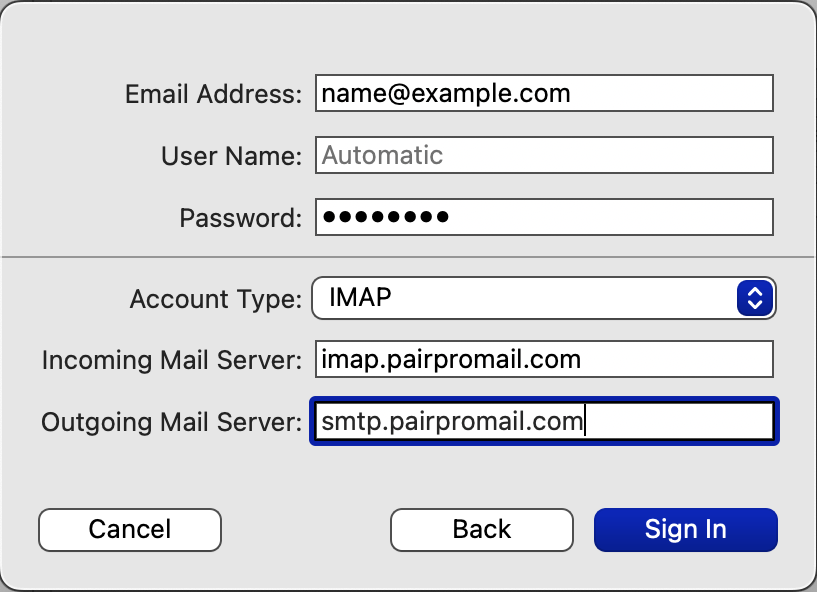
7. Enter the following information:

User NameThis is the email address for the account
Account TypeChoose between IMAP or POP
* IMAP: Email is stored on the server and synced between devices
* POP: Email is stored on the device and not synced between devices
For more information, check out: IMAP vs POP: Which Should You Use?
Incoming Mail ServerIf you chose IMAP, use: imap.pairpromail.com
If you chose POP, use: pop.pairpromail.com
Outgoing Mail Serversmtp.pairpromail.com

What the Email Settings window looks like

8. Click Sign In

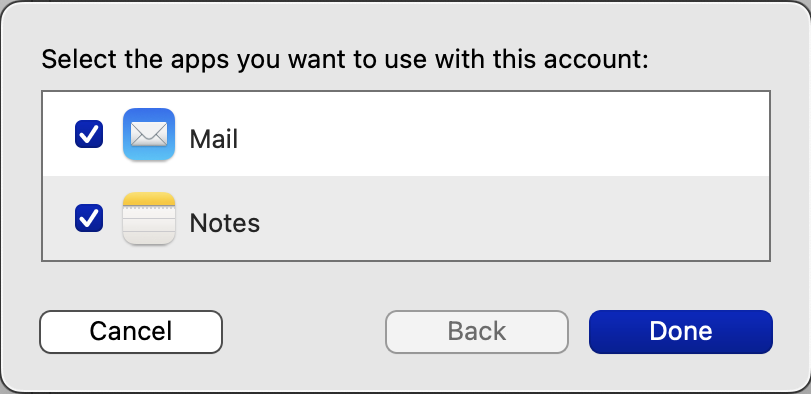
9. Select the apps you want to use with the account

Choose Mail and/or Notes

10. Click Done

Setting Up Pair Pro Mail in iOS

After you create a mailbox, you can follow these steps to set it up in iOS:

1. Open Settings on your iPhone or iPad

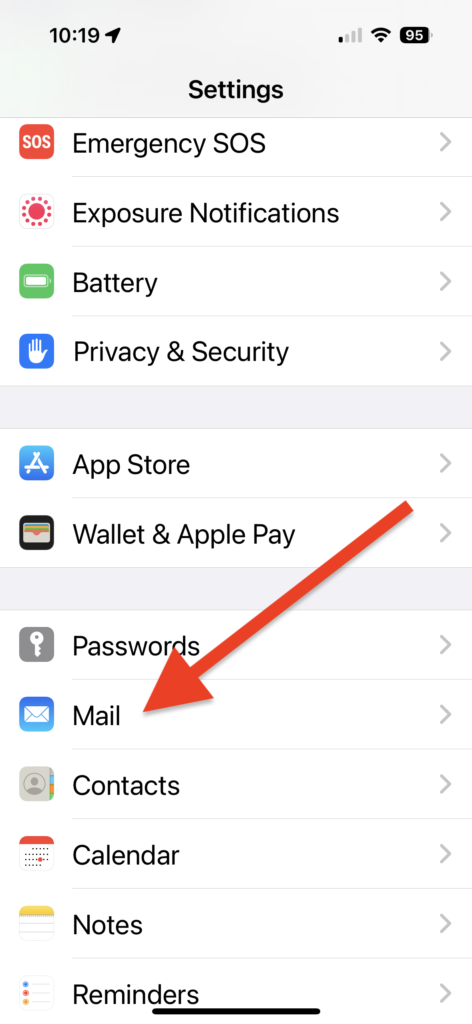
2. Tap Mail

Where to find Mail in Settings

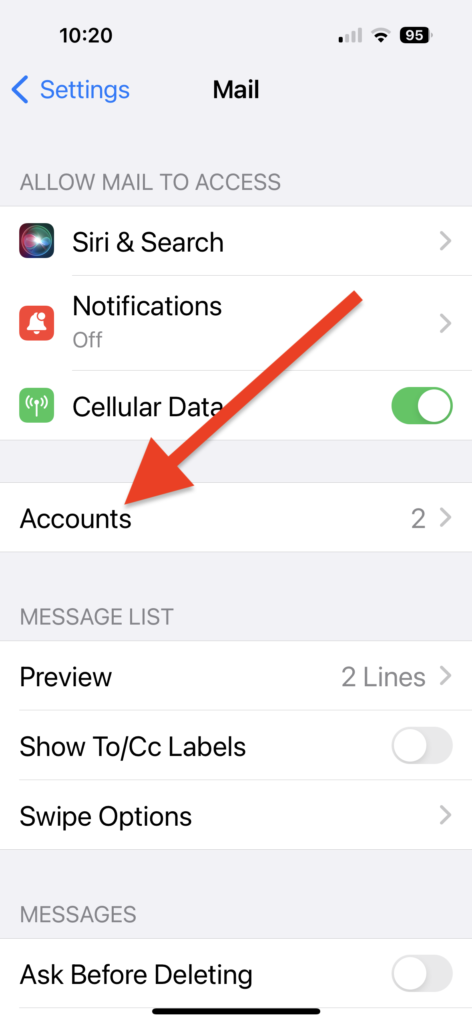
3. Tap Accounts

Where to find Accounts in Mail Settings

4. Tap Add Account

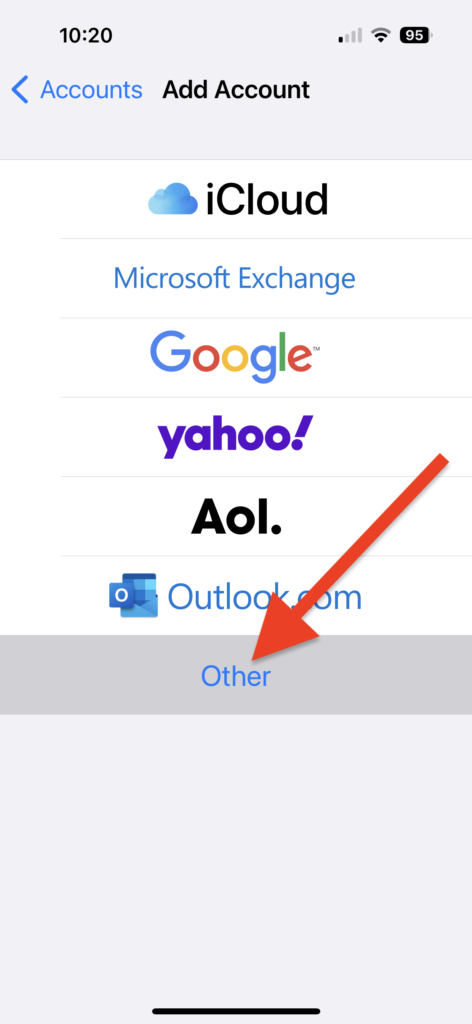
5. Tap Other

Where to find Other

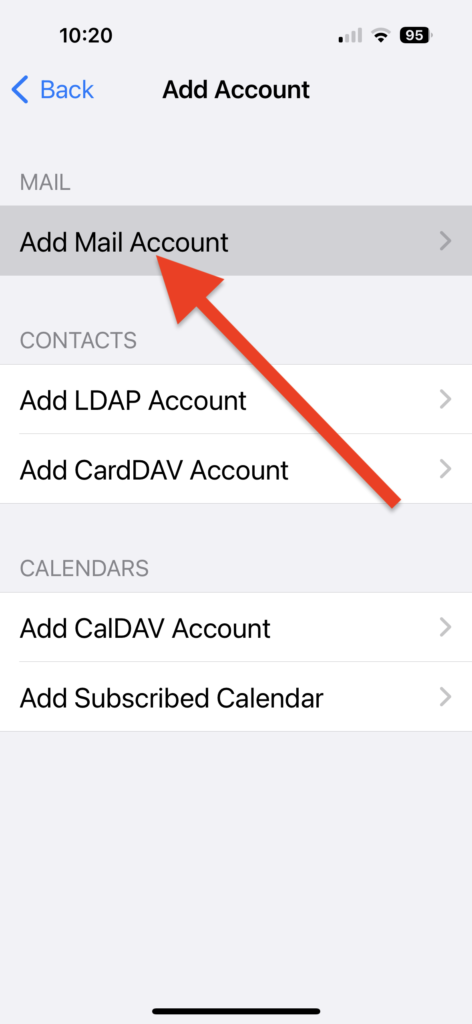
6. Tap Add Mail Account

Where to find Add Mail Account

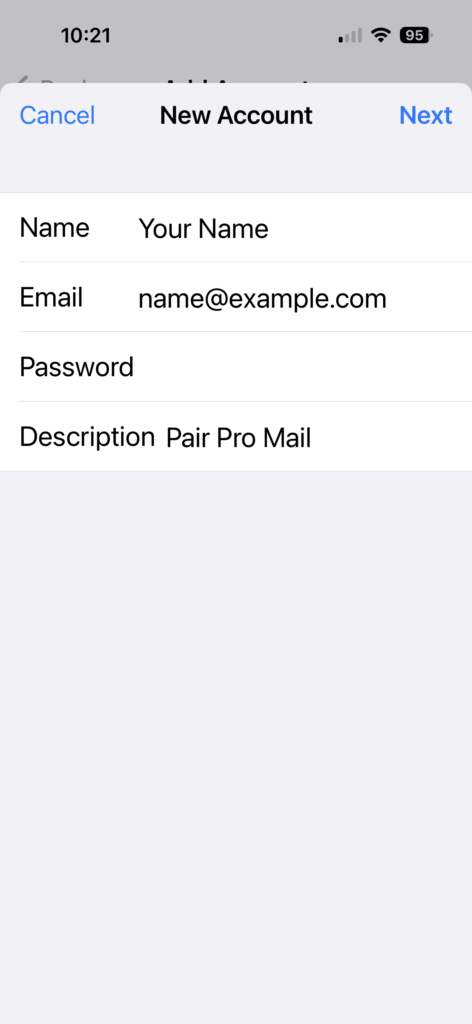
7. Enter the following information:

Name: This name will appear next to your address when you send email

Email: This is the email address for the mailbox

Password: This is the mailbox password

Description: This description is used only on your device to identify this account

What the New Account popup looks like

8. Tap Next

9. Select IMAP or POP

  • IMAP: Email is stored on the server and synced between devices
  • POP Email is stored on the device and not synced between devices

For more information see our IMAP vs POP: Which Should I Use? article

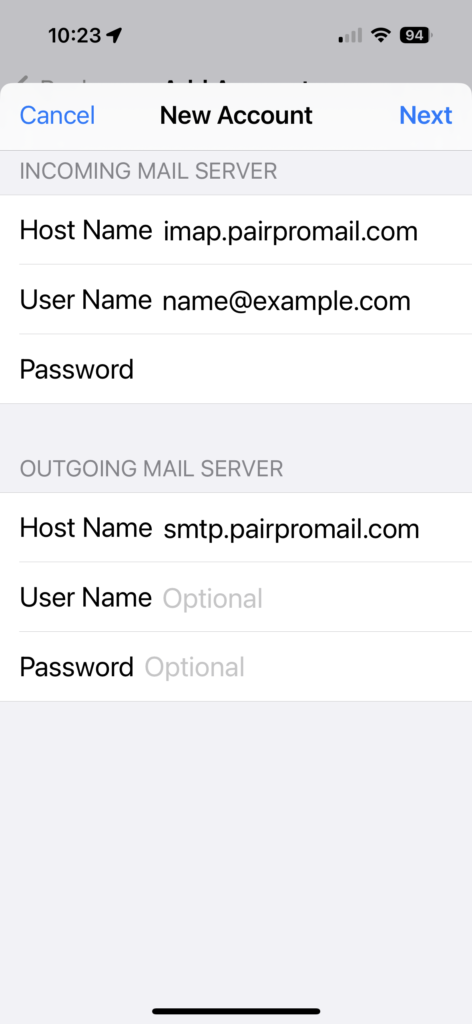
10. Fill in the following information under Incoming Mail Server

Host Name: If you chose IMAP, enter: imap.pairpromail.com
If you chose POP, enter: pop.pairpromail.com

User Name: This is the email address for the mailbox

Password: This is the mailbox password

What the New Account Info popup looks like

11. Fill in the following information under Outgoing Mail Server:

Host Name: smtp.pairpromail.com

User Name: This is the email address for the mailbox

Password: This is the mailbox password

12. Tap Next

13. Select the features to use from this account

14. Tap Save