Email Forwarding with Pair Pro Mail

You can use Pair Pro Mail to automatically forward email to another address. Please follow these steps if you want to set up Forwarding in Pair Pro Mail:

  1. Log into the mailbox at pairpromail.com
  2. Click the gear icon
  3. Click All settings
  4. Scroll down and click Rules
  5. Click Auto forward
  6. Toggle the switch to On
  7. Enter the destination email address
  8. It is not required to check Keep a copy of the message, but
    we recommend checking it
  9. Click Apply Changes

Setting Up Pair Pro Mail in Outlook

If you have not already created a mailbox, please visit our guide to Adding Pair Pro Mail to Your Domain.

After you create a mailbox, you can follow these steps to set it up in Outlook:

1. Open the Outlook app.

2. If this is your first time using the Outlook app, skip to Step 5.
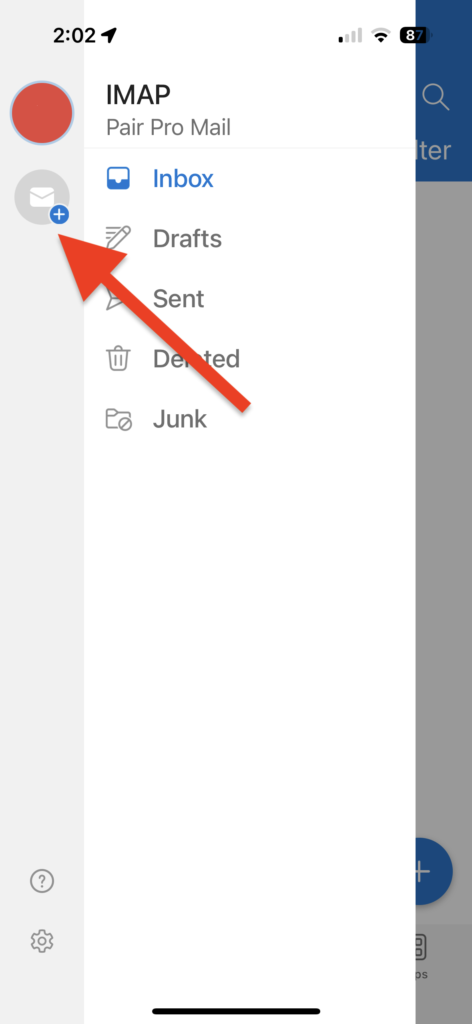
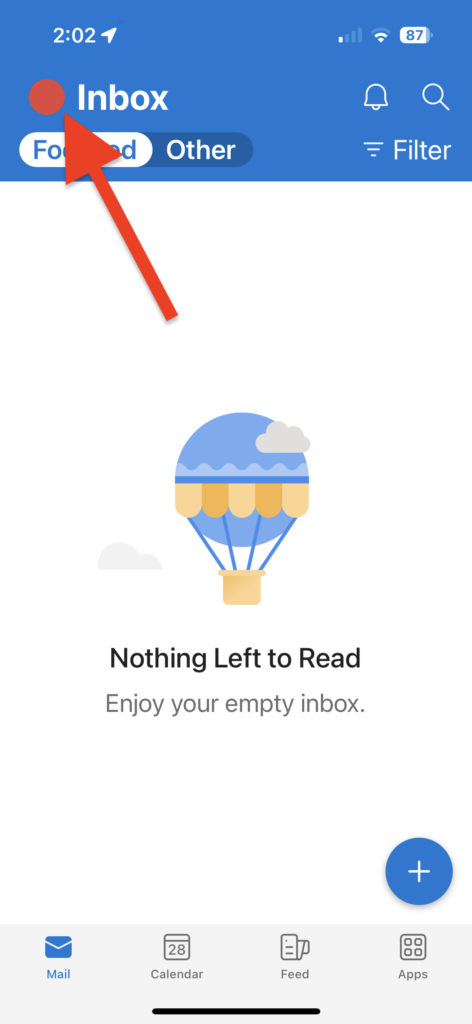
If you have used the Outlook app before, open the menu from the upper left.

Where to find the menu

3. Tap the envelope with the plus icon.

Where to add an account

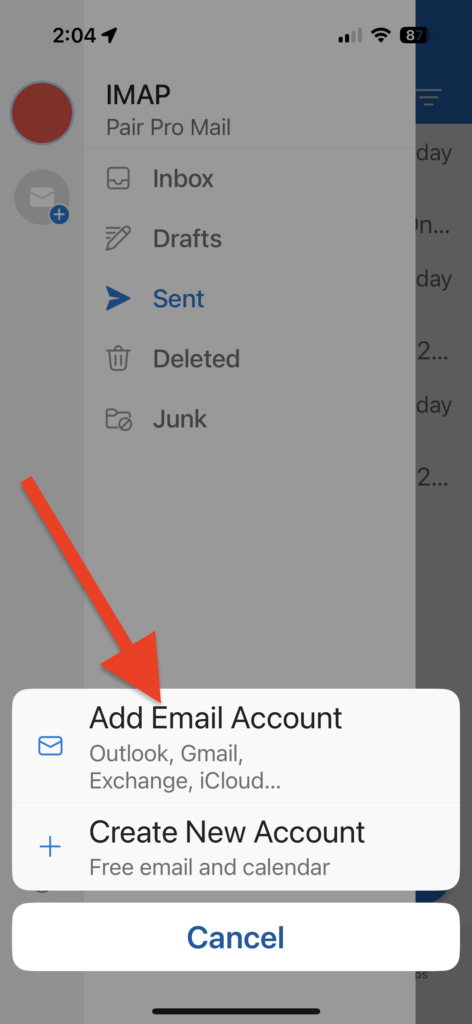
4. Select Add Email Account.

Where to add an email account

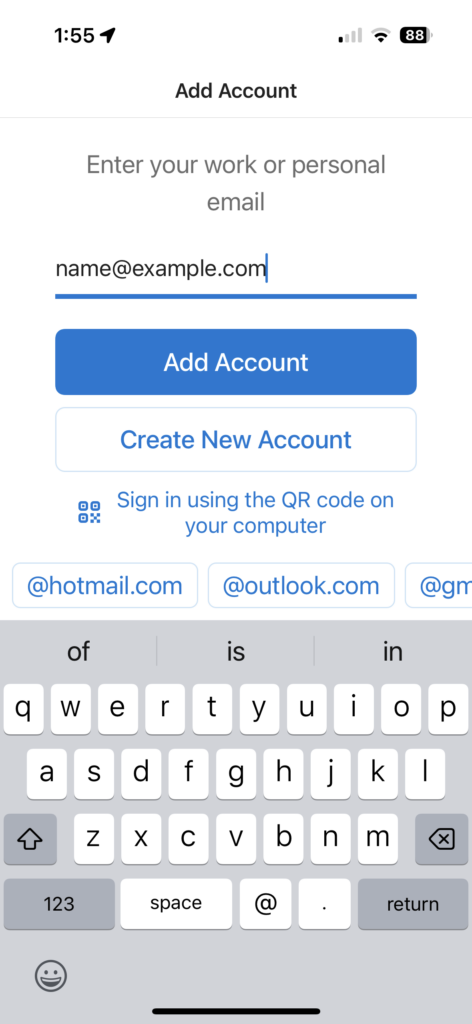
5. Enter your email address, and tap Add Account.

What the Add Account screen looks like

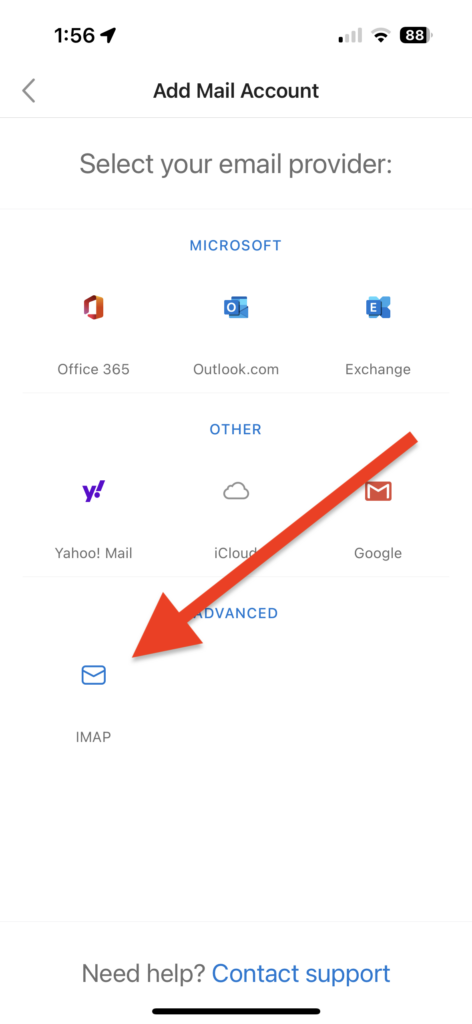
6. Tap IMAP.

Where to find IMAP

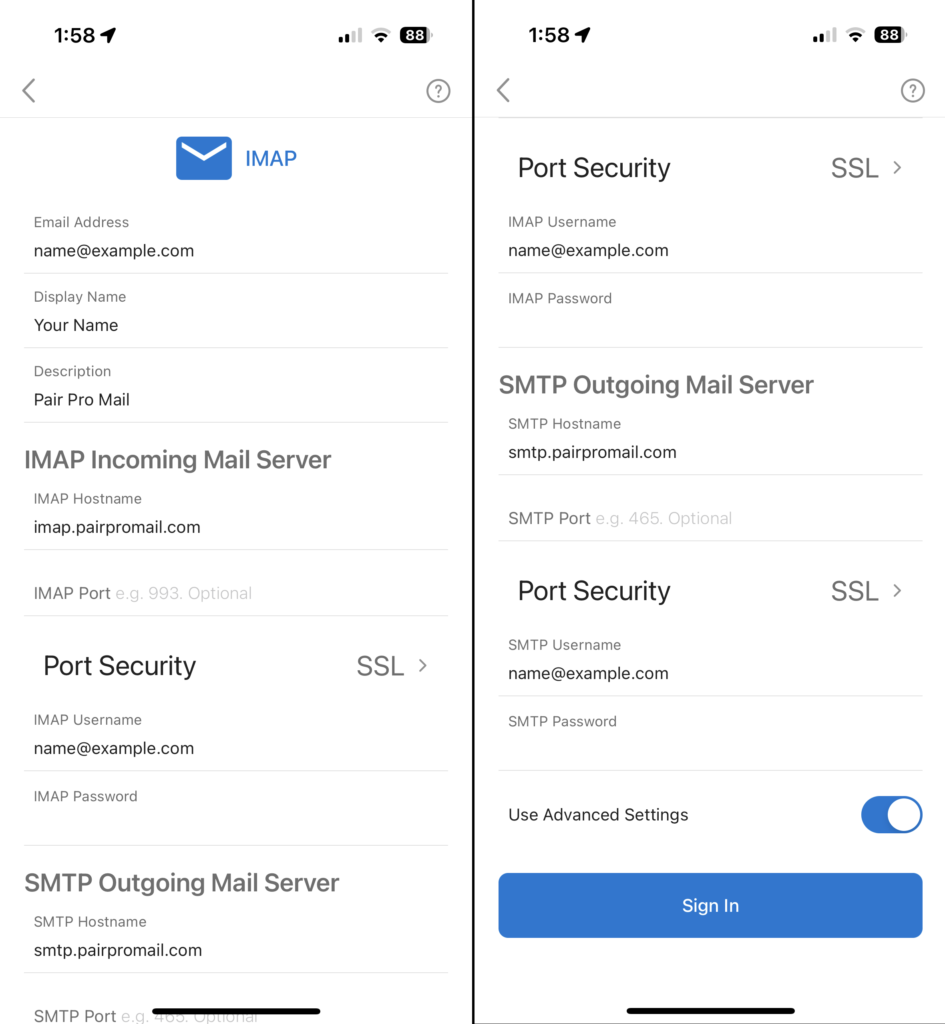
7. Enter the following information:

Email AddressThis is the email address for the mailbox
Display NameThis name will appear next to your address when you send email
DescriptionThis will help you identify your account in the Outlook interface
IMAP Hostnameimap.pairpromail.com
IMAP PortLeave this blank or enter 993
IMAP UsernameThis is the email address for the mailbox
IMAP PasswordThis is the password for the mailbox
SMTP Hostnamesmtp.pairpromail.com
SMTP PortLeave this blank or enter either 465 or 587
SMTP UsernameThis is the email address for the mailbox
SMTP PasswordThis is the password for the mailbox

What the IMAP settings look like

8. Tap Sign In.

Accessing Pair Pro Mail in Gmail

You can set up Autoforwarding to direct mail sent to your Pair Pro Mail account to your Gmail account.

  1. Log in at https://pairpromail.com/
  2. Click the gear icon in the upper right of the page
  3. Select All Settings
  4. Mail settings should be automatically selected. If it is not, select it
  5. Scroll down and select Rules
  6. Click Auto forward
  7. Toggle the switch to On
  8. Enter your Gmail address
  9. Click Apply Changes

Setting Up Pair Pro Mail in Mac Mail

After you create a mailbox, you can follow these steps to set it up in Mac Mail:

1. Open your Mac’s Mail app

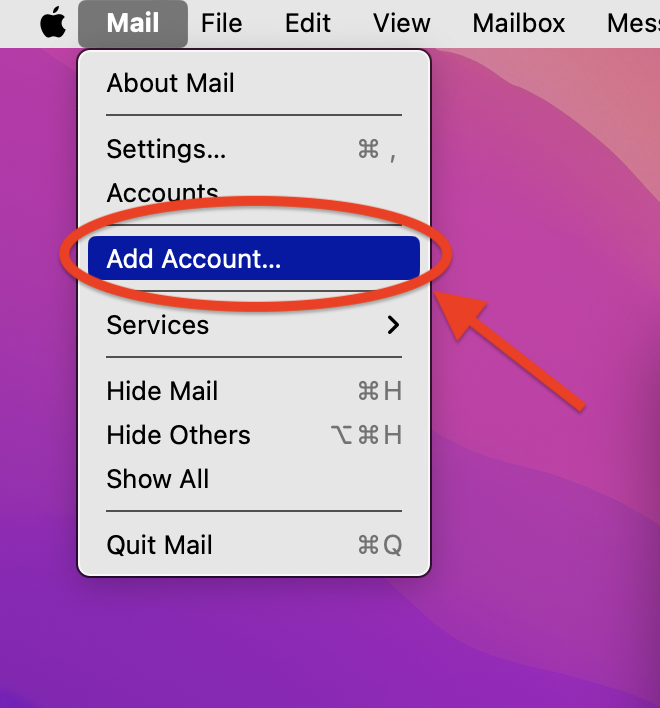
2. In the top navigation bar, click Mail

3. Select Add Account from the drop-down

Where to find the menu option to add an account

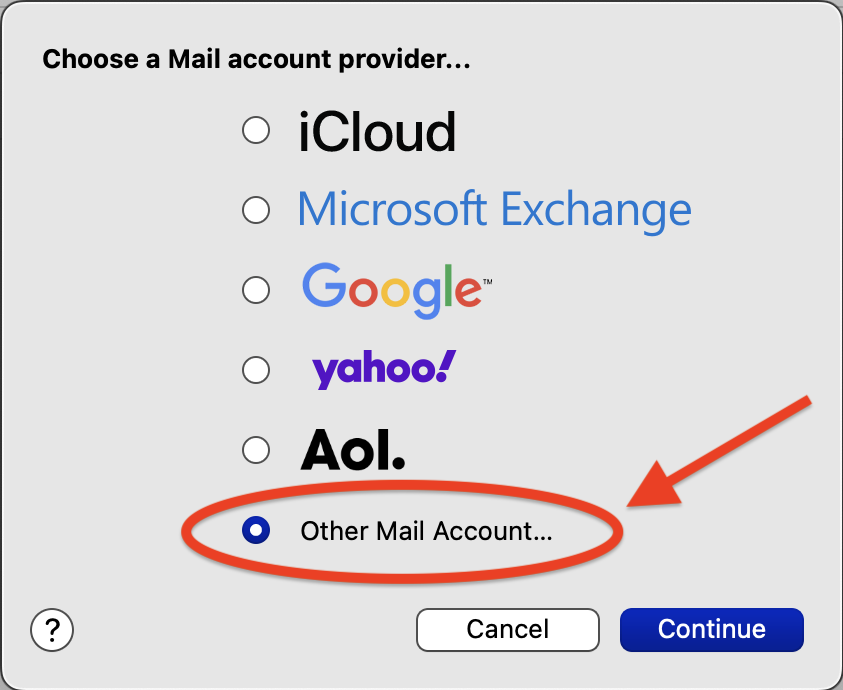
4. Select Other Mail Account, then click Continue

Where to find the Other Mail Account... option

5. Enter the following information:

NameThis name will appear next to your address when you send email
Email AddressThis is the email address for the mailbox
PasswordThis is the mailbox password

What the Add a Mail account window looks like

6. Click Sign In

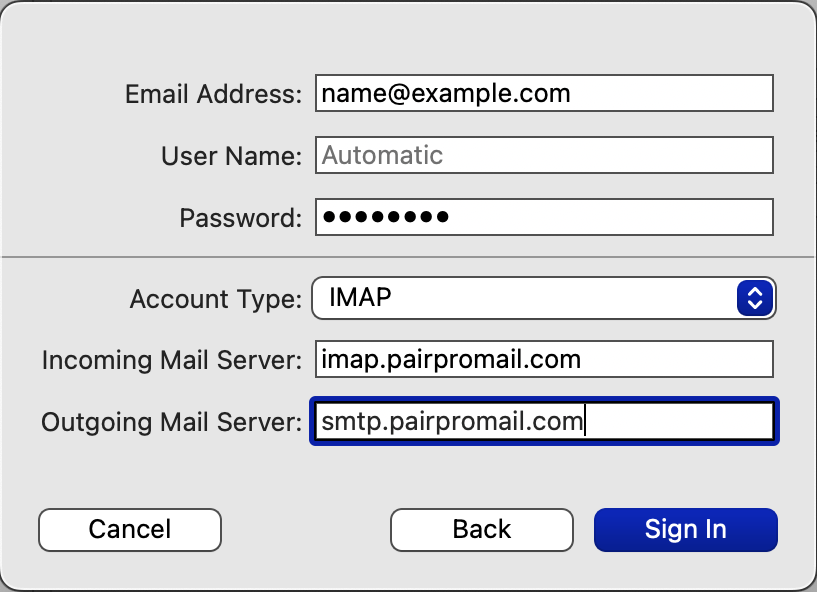
7. Enter the following information:

User NameThis is the email address for the account
Account TypeChoose between IMAP or POP
* IMAP: Email is stored on the server and synced between devices
* POP: Email is stored on the device and not synced between devices
For more information, check out: IMAP vs POP: Which Should You Use?
Incoming Mail ServerIf you chose IMAP, use: imap.pairpromail.com
If you chose POP, use: pop.pairpromail.com
Outgoing Mail Serversmtp.pairpromail.com

What the Email Settings window looks like

8. Click Sign In

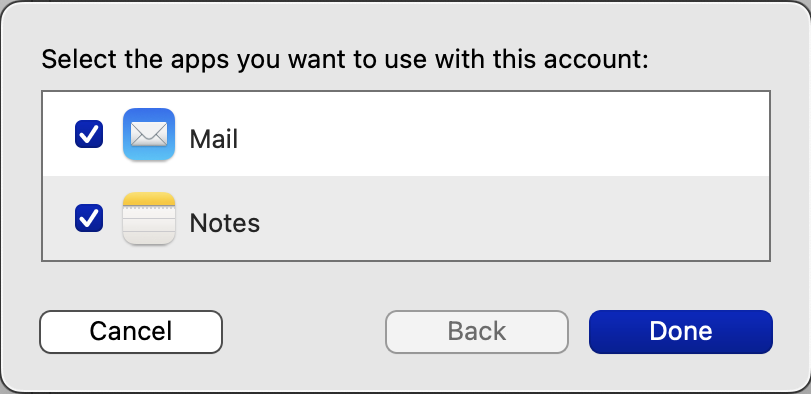
9. Select the apps you want to use with the account

Choose Mail and/or Notes

10. Click Done

Setting Up Pair Pro Mail in iOS

After you create a mailbox, you can follow these steps to set it up in iOS:

1. Open Settings on your iPhone or iPad

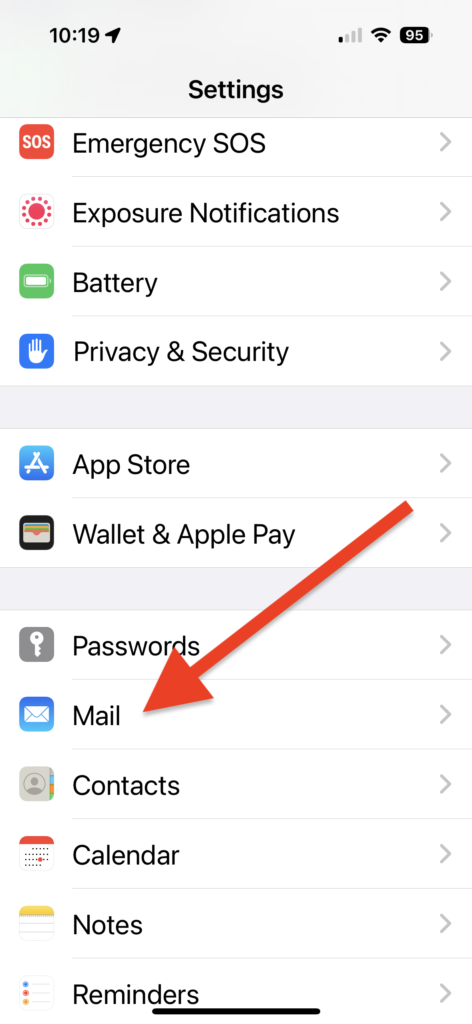
2. Tap Mail

Where to find Mail in Settings

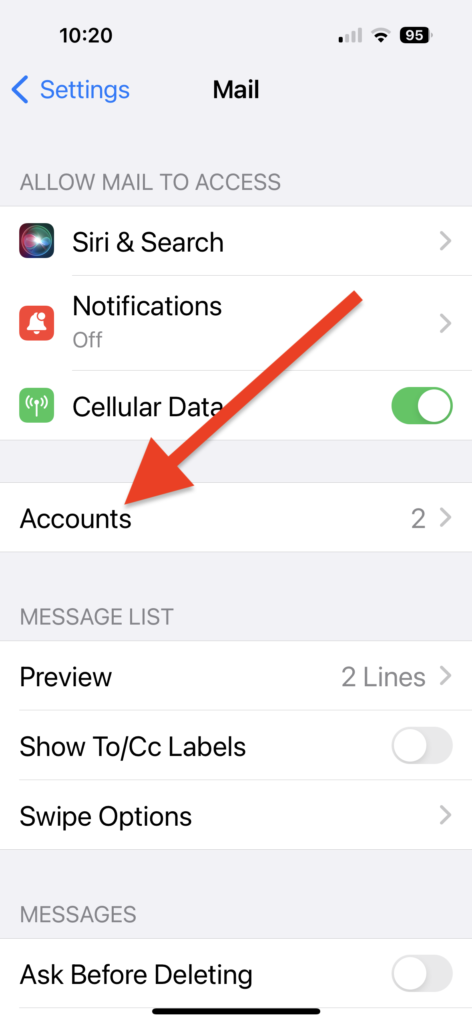
3. Tap Accounts

Where to find Accounts in Mail Settings

4. Tap Add Account

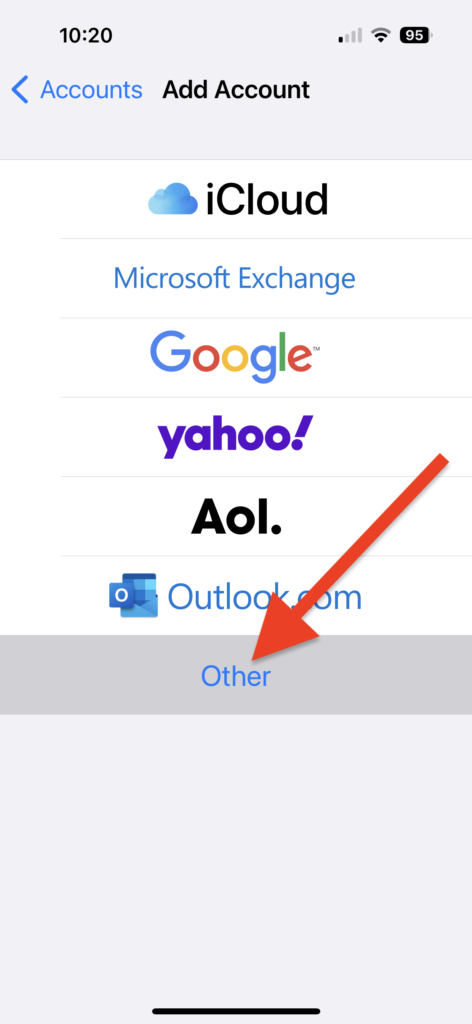
5. Tap Other

Where to find Other

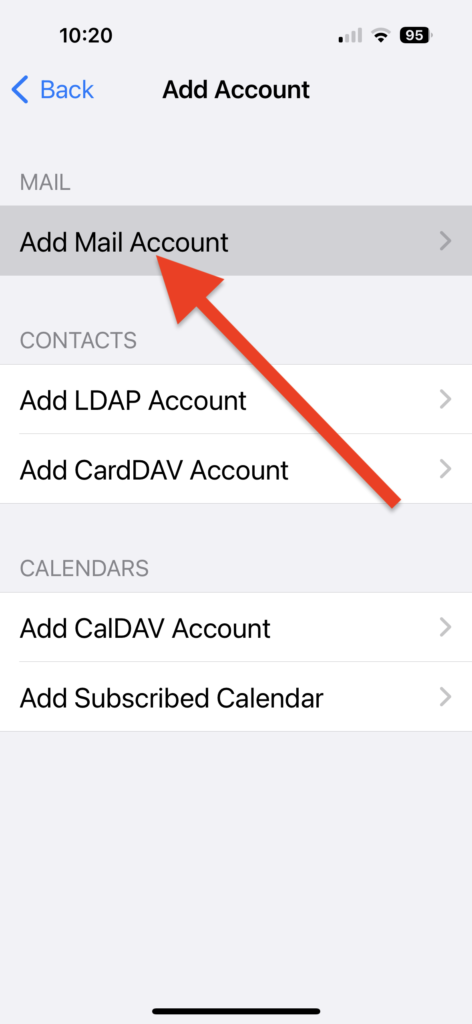
6. Tap Add Mail Account

Where to find Add Mail Account

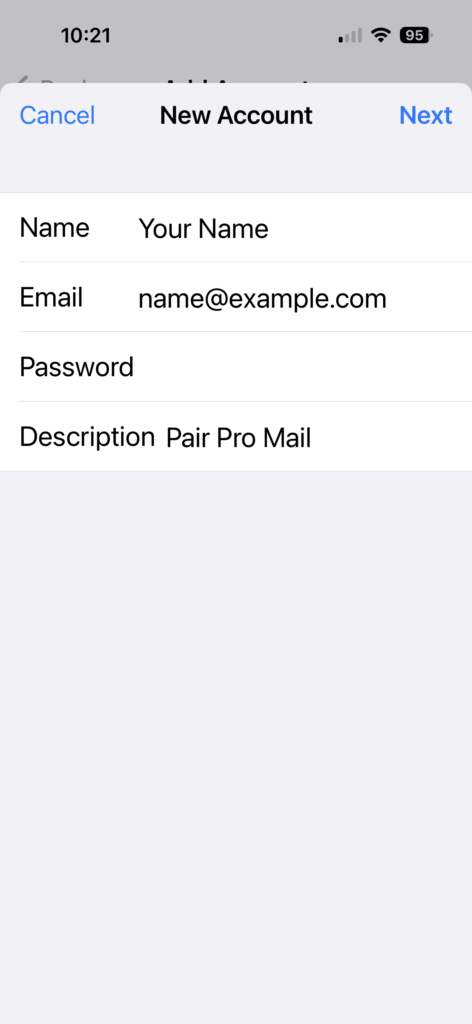
7. Enter the following information:

Name: This name will appear next to your address when you send email

Email: This is the email address for the mailbox

Password: This is the mailbox password

Description: This description is used only on your device to identify this account

What the New Account popup looks like

8. Tap Next

9. Select IMAP or POP

  • IMAP: Email is stored on the server and synced between devices
  • POP Email is stored on the device and not synced between devices

For more information see our IMAP vs POP: Which Should I Use? article

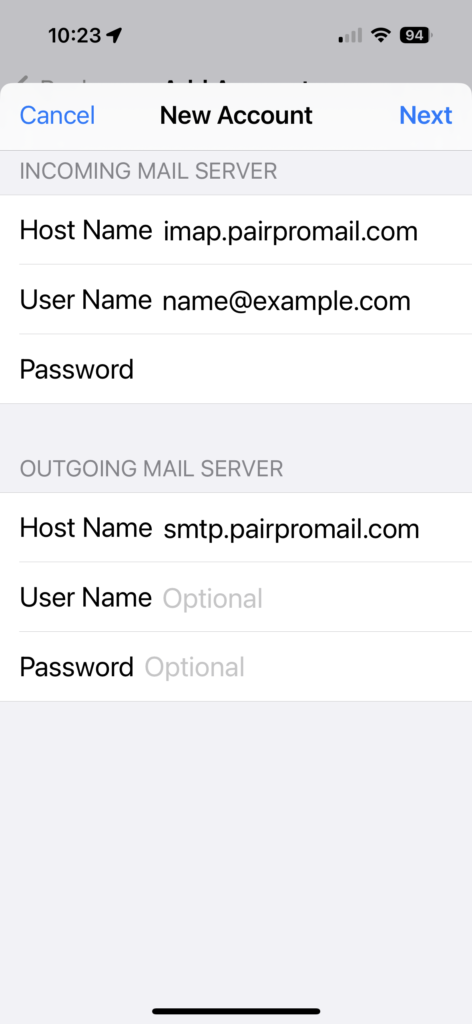
10. Fill in the following information under Incoming Mail Server

Host Name: If you chose IMAP, enter: imap.pairpromail.com
If you chose POP, enter: pop.pairpromail.com

User Name: This is the email address for the mailbox

Password: This is the mailbox password

What the New Account Info popup looks like

11. Fill in the following information under Outgoing Mail Server:

Host Name: smtp.pairpromail.com

User Name: This is the email address for the mailbox

Password: This is the mailbox password

12. Tap Next

13. Select the features to use from this account

14. Tap Save
Setting Up Pair Pro Mail

Please visit our Knowledge Base article Adding Pair Pro Mail to Your Domain for steps to add Pair Pro Mail. After you add it, you can set up an email client to access your mailbox, or you can use our Webmail page.

Pair Pro Mail Webmail

Setting Up an Email Client

See how to set up Pair Pro Mail in iOS

See how to set up Pair Pro Mail in Mac Mail

See how to set up Pair Pro Mail in Gmail

See how to set up Pair Pro Mail in Outlook

You will need the following information to manually set up an email client:

Username
This is your email address. Use the full address, like mailbox@example.com.

Password
This is the password you set for the mailbox.

IMAP or POP
Choose between IMAP or POP.

  • IMAP: Email is stored on the server and synced between devices
  • POP: Email is stored on the device and not synced between devices
  • For more information, check out: IMAP vs POP: Which Should You Use?

Incoming Mail Server / Hostname
If you chose IMAP, use: imap.pairpromail.com
If you chose POP, use: pop.pairpromail.com

Outgoing Mail Server / Hostname
smtp.pairpromail.com

Ports
These are the recommended ports for IMAP, POP, and SMTP:
IMAP: 993
POP: 995
SMTP: 465 or 587

Note: Email clients sometimes incorrectly pre-populate email data. We recommend selecting your email client’s manual configuration option and entering your information manually.

Pair Pro Mail Quotas

Each domain using Pair Pro has a quota of 1 GB per mailbox. So a 1 mailbox plan has a quota of 1 GB, a 3 mailbox plan has a quota of 3 GB, and a 5 mailbox plan has a quota of 5 GB.

If the combined size of the mailboxes exceeds the quota, you be automatically upgraded to add an additional 5 GB of storage. Upgrades continue in 5 GB increments. The cost for a higher quota is $1 per month per 5 GB upgrade.

The upgrade cost will be charged on the last day of the month, and it is based on the quota used on that day.

Adding Pair Pro Mail to Your Domain

If you need a small number of mailboxes on your domain, you can use Pair Mail Pro to add one, three, or five mailboxes. If you need more than five, we recommend using a Pair Networks web hosting account for email.

You can follow these steps to add Pair Pro Mail to a domain:

  1. Log into the Domain Name Management System.
  2. Click the domain to update.
  3. Click Add Pair Pro Mail.
  4. If Custom DNS is already on, click Edit DNS.
    If Custom DNS is not on, click Use our DNS, and confirm changing the name servers.
  5. Choose the number of mailboxes and the term.
  6. Agree to the Automatic Renewal terms of service, and click Proceed to Checkout.
  7. Enter payment information, agree to the terms of service, and click Finish.
  8. Click the link “Click here” to set up your new Email product.
  9. Click Add New Mailbox.
  10. Enter a username for the mailbox.
  11. Enter and confirm a password for the mailbox.
  12. Select the language and timezone.
  13. Enter a Backup Email that will be used if you need to reset the mailbox password.
  14. Click Create.